
 Rendering lard is the simple process of heating the fatty tissue and skin from a pig after butchering. Why would anyone want to? Well, quite frankly lard has an undeserved bad reputation. Fat from a healthy farm raised pig contains a blend of saturated, polyunsaturated, and monounsaturated fatty acids. Most of the fat is made up of monounsaturated. It's called oleic fatty acid and it's widely recognized as being healthy for you in moderation. Don't believe me? It's the exact same fat as is found in olive oil. Our bodies need some fat for vitamin absorbtion and to maintain health. Used in moderation and in combination with lots of physical exercise, lard from your own pigs is a healthy fat with no artificial processing or chemicals in it.
The steps to render lard are really quite easy. You'll need a colander, cloth for straining, large pot for heating the fat, a ladle and a slotted spoon to remove cracklings. Decide on your storage method and pick appropriate containers. I like to use glass canning jars with screw top lids. If your fat is not already cut up into little pieces you can have it ground or you can chop it by hand requiring a board and a sharp knife.
Step 1. Get some fat. Ask your local butcher, farmer or keep some back when processing your own pigs. The very best pastry lard comes from around the kidneys (called 'leaf') and this makes beautiful snowy white lard used for pastries. Render this separately if you can. For the rest of the lard we're just going to grind of chop finely all our fat and skin. I separate any bigger pieces of attached meat and give the cats and dog a treat.
Step 2. Heat a large pan on low or use a crock pot on low and fill with your ground or chopped fat. It will slowly melt and you should stir it occasionally to be sure that the bottom of the pot never gets too hot and burns the fat. I usually start out warming whatever I've got chopped up and then add more and more as the stuff in the pot melts and I get more cut. The whole process can take a couple of hours but don't be tempted to raise the heat and risk burning the fat. If you start out with frozen fat then put a little water in the pot before adding the fat. It'll stop if from scorching before the ft melts and the water will evaporate off during rendering.
Step 2 A. Open a window. If you've got the ability to do this outside then give it a go but if you're indoors and don't want a greasy smelling house then open a window or 2 (or 3).
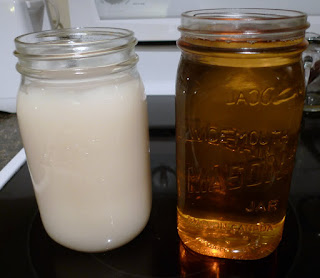
Step 3. Once all the fat has been melted out you'll be left with cracklings (pieces of fried meat and skin) and lard. The cracklings at this stage should resemble lightly cooked ground beat and still be quite soft. Remove the cracklings to a separate container. Set your colander over a large bowl or pot to catch the melted lard. Line the colander with a single layer of cloth and strain the melted fat through. If you leave the lard too long on the heat it will turn a more golden colour and make a yellowish lard. It's still perfectly good but will make any pastry taste a little savoury. Read that as 'porkish'. Fine for a meat pie but maybe not for delicate pastries or cookies. The whiter the lard, the less odour it will have.
Step 4. Pour your strained fat into clean jars and leave to cool uncovered. It'll look like a slightly yellow liquid. Once it's cool, set and turned white or as white as it's going to get, cover the jars and store. Fats that are stored in cool conditions take longer to turn rancid than ones just stored in the cupboard so your cool room is ideal. If properly stored your lard will easily last you until next year when you do this whole process again, possibly in 6 months. Lard that's frozen can last a year. Since we're not making hydrogenated lard like the stuff in the store it will not last as long as the stuff from Safeway. But that's ok because this stuff is better for you.
Step 5. Put the cracklings back into the original pot to continue frying until golden and crispy. Drain on paper towels. Season with salt and a little pepper. Eat as a snack or on salad for some extra crunch.
Mine is slowly heating away in the pot as we speak. I've got 8 bags of approx 6 lbs each so that should render me approximately 20 lbs of lard I should think. This lack of fat in today's pork is the reason it's got no marbling and is the other 'white dry meat'. Heritage breeds could easily yield up to 40 lbs of fat per pig and have lovely dark meat that's marbled, just like good beef. For hard working self-sufficient people the amount of calories you need is incredibly high and so you could remain perfectly healthy while eating this fattier meat. Eating meat in combination with whole grain breads, beans and lots of veggies should supply all the vitamins and minerals you need to stay healthy. Since we know so much about the necessity of vitamin C, D, A etc then we can plan our gardening appropriately.
We can plan our foraging too. In addition to foraging for greens, herbs, mushrooms and fruit we should look for rose hips, especially in the winter when everything else is gone. Rose hips (the reddish seed pod left over from a rose flower) make both delicious tea and syrup and was widely used as a vitamin C supplement traditionally in the winter. It became popular again in Britain during the second world war when Canada's cod liver oil (the supplement of choice) was not available as readily due to sinking of supply boats by the Germans. It's one of those things that survived because the poorest people were still using it as a remedy so the knowledge was in regular use. It's a fun project to do with kids, searching the bushes at the sides of a trail for wild rose hips on a sunny winter day. Rose hips can be dried and combined with other flavourings for dried tea mixes. Dried apple and rose hip is particularly nice and refreshing. Here's the recipe for syrup. Again, another easy one to do with kids.
Pick rose hips once they are as red as they will go or after the first frost. Remove any sticks, flower parts that remain and stems. Rinse well in cold water. Measure hips
 into a pan. Add 1 cup of water for every 2 cups of hips. So if you have 7 cups of hips you'd add 3.5 cups of water. Bring to a low boil and simmer for 20-30 minutes uncovered until the water has reduced by half. Cool for 10 minutes. Strain through a jelly bag or multiple layers of cheese cloth. Add 1 cup of honey for every 1 cup of hip juice and mix together well. Pour into clean jars and leave until completely cool. Screw on lids (the plastic ones are good for this) and store in a cool and dark place. The syrup keeps well because of the preservative properties of the honey but should still be refrigerated once opened and watched for signs of spoiling. Hip syrup can be taken as it but is more easily accepted by the uninitiated as a sweetener in tea or on ice cream or pancakes! Yum!
There you go, 2 of my fall recipes, well sort of. I guess rendering lard is not recipe, it's a process. Gotta go stir my pot again.
No comments:
Post a Comment